If you want to transfer the tasks that you previously worked with in another service to your Uspacy Space then simply import the data from the file.
💡 Only an administrator or superadministrator of Space can do this.
Uploading a file
To start the import, go to the tasks page, click on the gear and select Import from file.

Next, upload the file from your personal computer.
❗️The file for import must be in *CSV format in UTF-8 encoding. In Excel, this is named: CSV UTF-8 (comma-delimited) (*csv).
The columns in it will be mapped to the fields at Uspacy. And each row of the file is a separate task.

Pay attention to the import recommendations.

You can also use a template.
🔍 If you have difficulties with the correct display of the template in Excel, we advise you to read our article, where we told how to fix it.

Preview and fields mapping
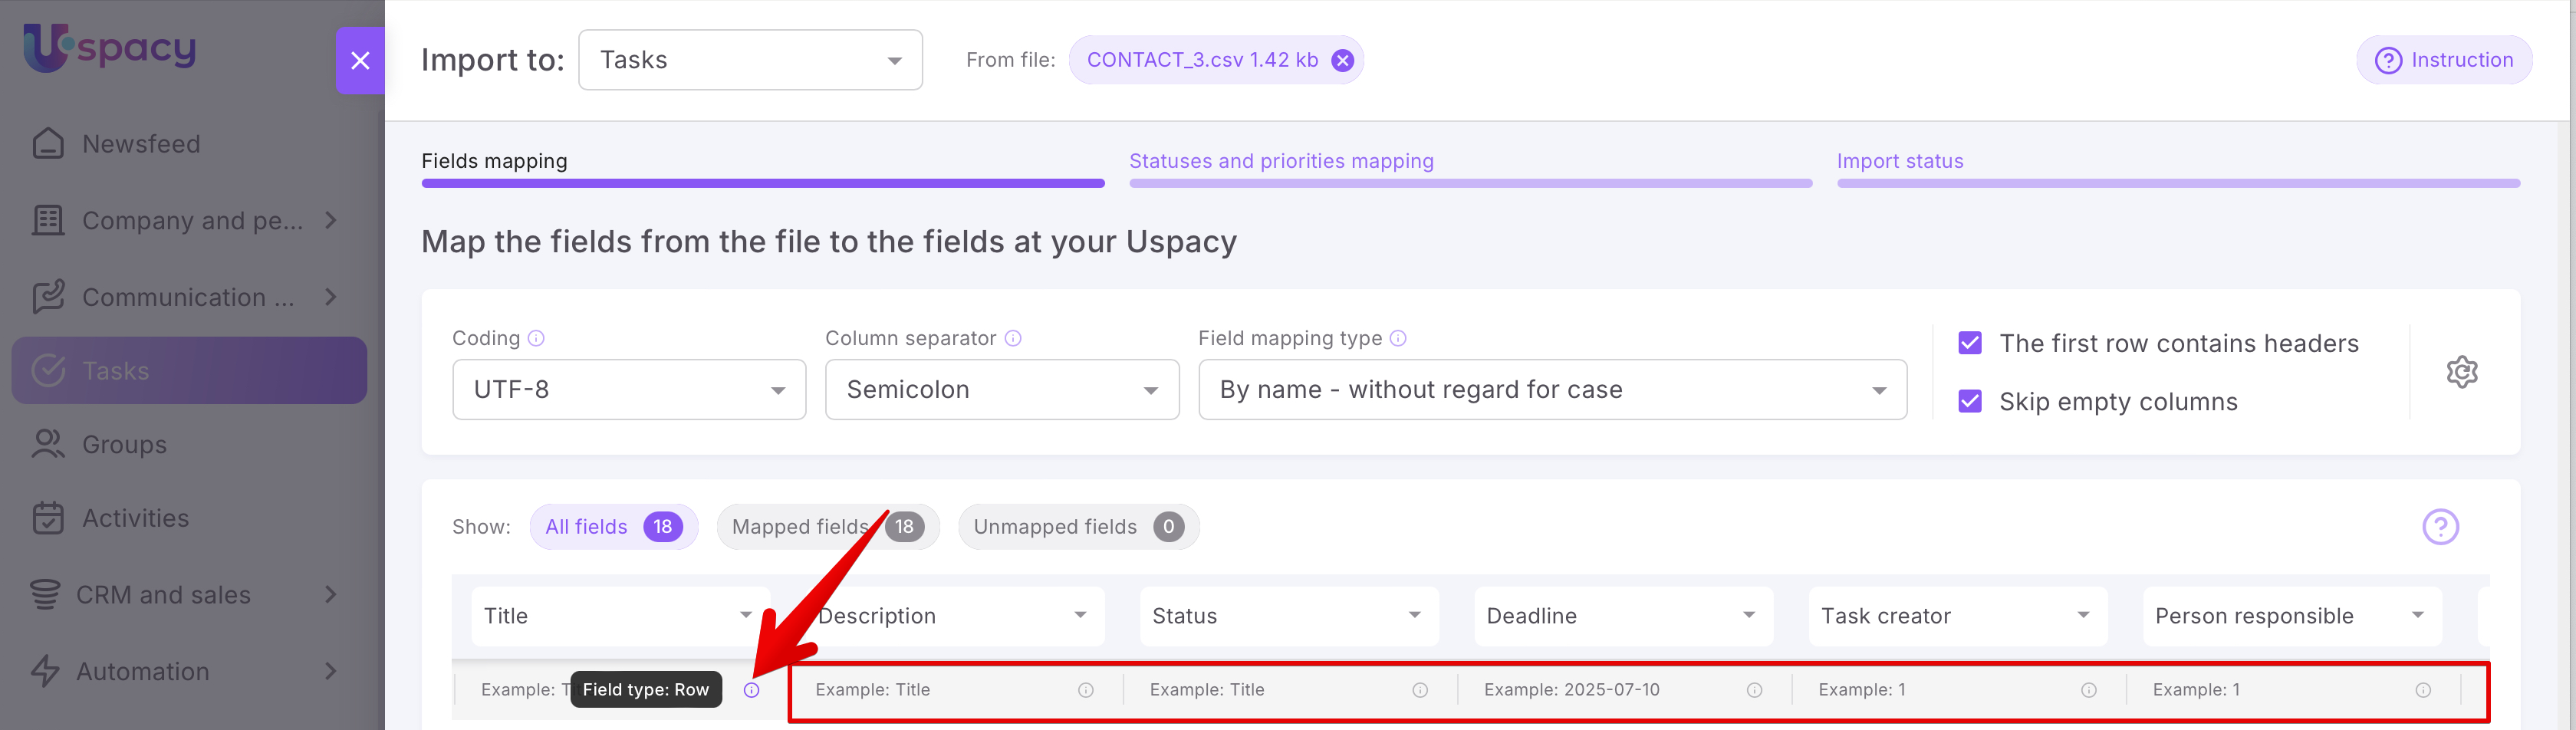
The settings and preview page will open. Here you can set import parameters and map fields from the file to fields at Uspacy tasks.
First pay attention to: Encoding, Delimiter and Field mapping type.
💡 Advice

Next, select whether the first row will contain headers. If you uncheck the box, it will look like the screenshot below.
☝🏻If the first row of the file does not contain headers, then it will be imported. A task will be created as a result of the import.

And if you leave a check mark, the headers will be highlighted. The first row of the file will not be involved in import.

Also specify whether to skip empty columns. If you uncheck the box, then on the preview page you will see an empty column that is in your file.

If you leave a check mark, the column will not be displayed.

❗️☝🏻But note that if the option is active but you still see an empty column, it means that there is no data in the rows that are available for preview. But in general, the file in this column has filled rows, but they did not get into the preview mode.
You can return to the previous settings at any time using the reset button.

For a successful import, you need to map the fields from the file to the fields at the Uspacy tasks. The system does this automatically. But it maps some fields according to the required values at once.

And others - to the value Do not import. For them, you need to manually specify the fields into which the information from the rows of the file will be transferred.

❗️If you leave the value Do not import, then the data from this column will not be transferred at all.
💡 Note: The examples show the types of fields and data formats as they appear in the system after import. They are NOT samples of how your data should look in the file.
At any time before the import starts, you can delete all mappings by clicking on the special button.

But you must confirm your actions. The system will also inform you that all fields will need to be mapped manually after the reset. That is, you will not be able to return to the previous settings, as well as to start the import.

As a result of the reset, all columns from the file will be transferred to the Unmapped fields section. Fields that could not be mapped for technical reasons may also be displayed here.

Peculiarities of fields mapping
To continue and correctly import tasks, you must have the Status and Priority columns in the file and map them to the fields of the same name at Uspacy.

❗️If you skip this and start the import without mapping these fields, all your tasks will be transferred with the status Not scheduled and the priority Neutral.

Also, at least one mapped field is required to start import. Otherwise, the system will not be able to start data import.

Data from fields left unmapped will not be migrated. Remember about this when starting the import. But the system will allow you to go back and map the fields so that you don't accidentally lose important data.
💡 Pay attention!

When everything is ready, you can move on ⬇️

Mapping of statuses and priorities
In this step, you need to map the statuses and priorities to the statuses and priorities file at the Uspacy tasks.
The first is the Status tab. Check if the mapping is correct. If the names match, everything will be replaced automatically. It will work if the names of the statuses from the file and at the Uspacy tasks are identical.

Of course, everything can be changed manually if necessary.

When the statuses are mapped, the same should be done in the Priorities tab. If the names match, everything will be replaced automatically. It will work if the priority names from the file and at the Uspacy tasks are identical.

You can also change the priorities manually.

Mapping of users
When you have to map a user type field, for example, it could be the Task creator, Person responsible, Participants, Observers, then map the users from the file to the users at Uspacy before starting the import. To do this, switch to the appropriate tab.

If the names and surnames are the same, then they will be mapped at once. If not, you will have to do it manually.

When it is ready, go to the next step.
Start of import and the result
After configuring the import parameters, the required field mappings, statuses, and priorities, you can start the process of transferring tasks data from the file to Uspacy. To do this, click the Start import button.

Now just wait for the import to finish to start working on your tasks at Uspacy.
❗️ Do not close the page

If the import is successful, you will see the corresponding page 🚀

💡In case of an error, you can try to upload the file again, map the fields and start the import.
Now everything is ready! Tasks have been imported to your Space, you can start working on them.

If you have additional questions or you need to contact the support, send a request to this email [email protected]
Created: July 20, 2023 / Updated: July 10, 2025